
Blog
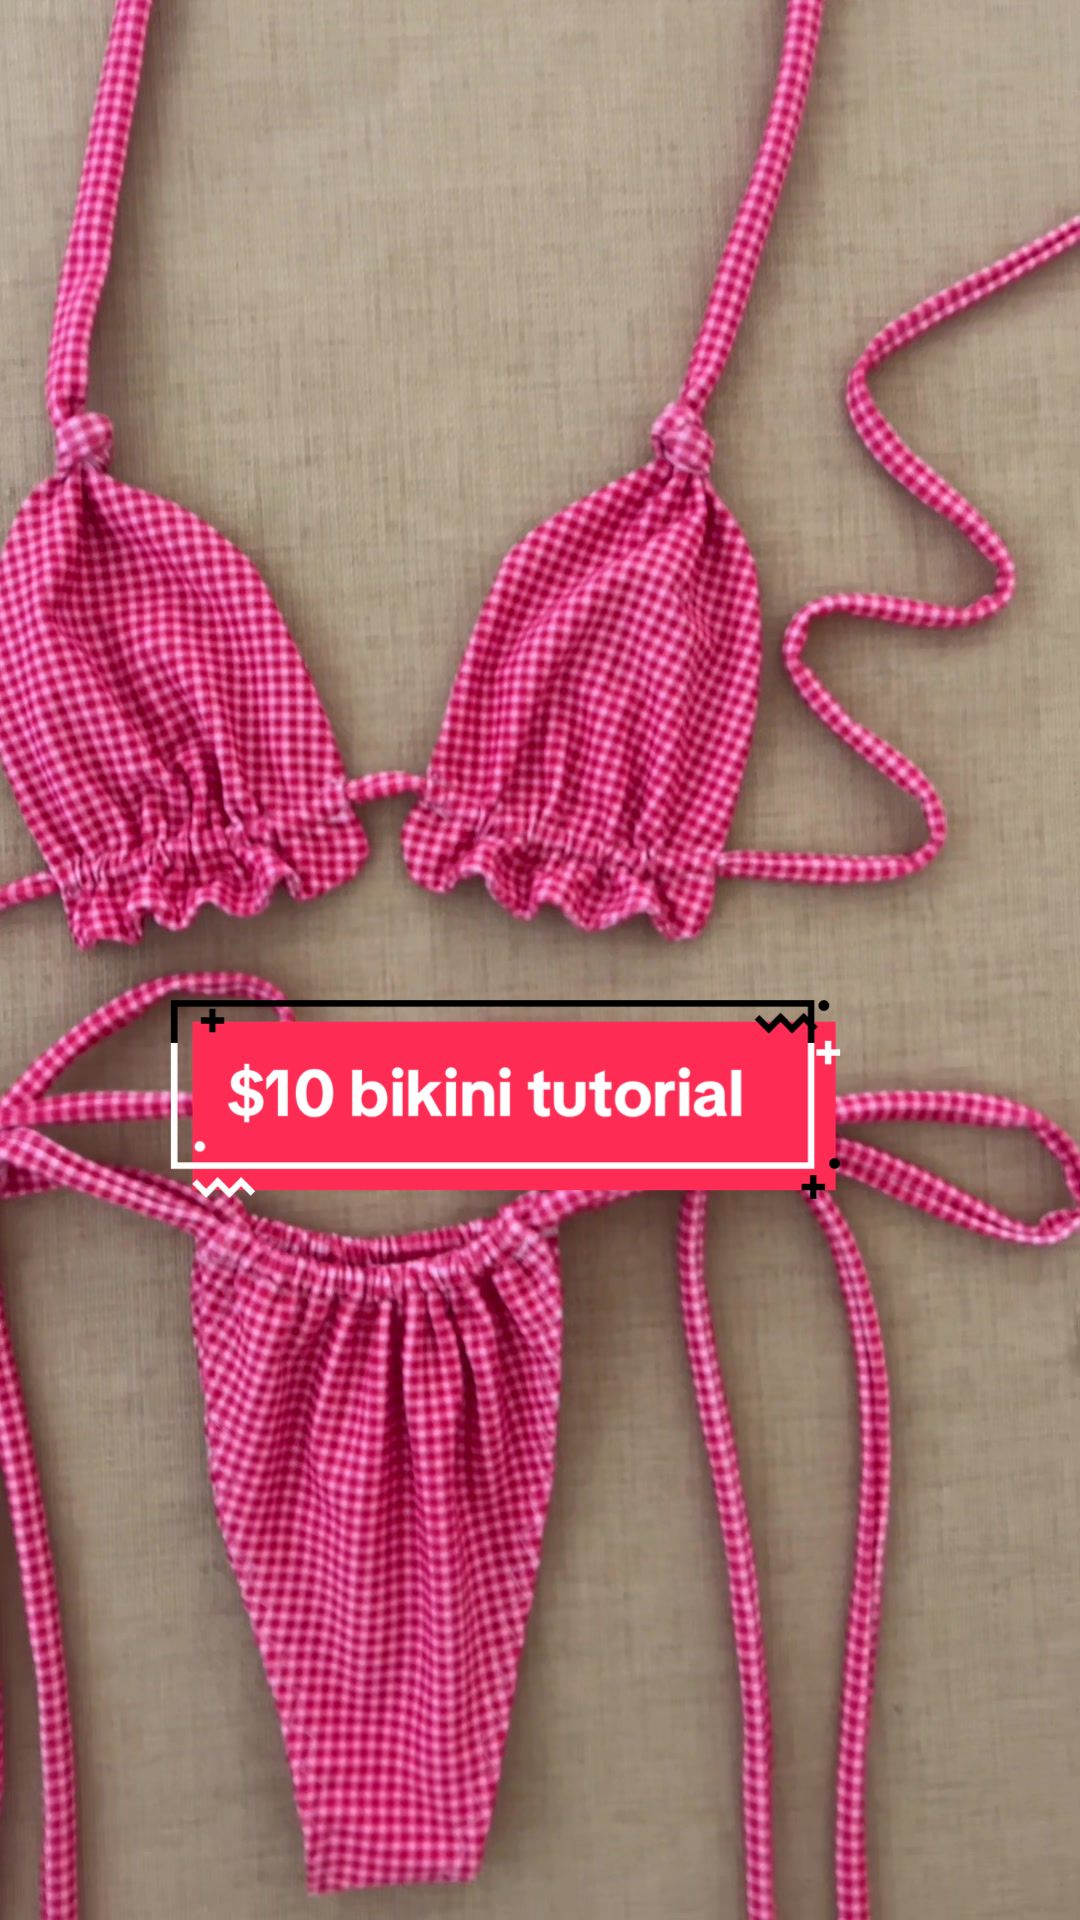
#Ditch the $80 Price Tag: Sew Your Own Bikini Top for Just $10!
Aug
Alright, y’all, Pastor Mysammich back at it again, bringing you the DIY gospel! Let’s be real, summer’s here, and nobody wants to drop a small fortune on a bikini top that’s probably gonna fall apart by Labor Day anyway. Carl over here nearly fainted when he saw what they’re charging for these things. Eighty bucks? Get outta here!
I’m here to tell you that you *can’t* afford *not* to learn how to sew. Seriously. This skill is a game changer. Today, we’re tackling a super cute bikini top, and I’m gonna show you how to do it for a measly $10. That’s right, folks, ten dollars! Let’s get started.
Why Sew Your Own? More Than Just Saving a Buck
Look, saving money is great, don’t get me wrong. But sewing your own clothes, especially something like a bikini top, is about so much more:
- Unleash Your Inner Designer: Forget settling for what’s on the rack. You pick the fabric, you control the fit, you create something uniquely *you*.
- Sustainable Style: Fast fashion is a plague. Making your own clothes is a small but mighty step towards a more sustainable wardrobe. Plus, you know exactly where your materials are coming from.
- Therapeutic AF: Seriously, there’s something incredibly calming about the rhythm of a sewing machine. It’s like meditation with a purpose!
- Bragging Rights: “Oh, this old thing? I made it myself.” *mic drop*
The $10 Bikini Top Breakdown: Let’s Get Stitchin’
So, how do we go from overpriced retail to runway-ready (well, beach-ready) for just ten bucks? Here’s the lowdown:
Materials You’ll Need:
- About a yard of your favorite stretchy fabric (think swimsuit material or a knit with good recovery) – $10 should cover this!
- Matching thread
- Scissors
- Sewing machine (borrow one if you don’t have one!)
- Loop turner (trust me, it’s worth the few bucks)
- Ruler or measuring tape (optional, I often freestyle)
Step-by-Step Instructions (with a Pastor Mysammich twist):
- The Strings: Fold your fabric in half, long ways. Cut strips that are about two fingers wide. These are your ties. The ones for the top of the triangles need to be a bit shorter, naturally.
- Triangle Time: Now, for the main event. I usually just eyeball these things, but if you’re feeling precise, use your hand as a guide. Fold the fabric in half to make sure it’s symmetrical and curve the bottom up a little. It just fits better, trust me. Or, if you’re feeling particularly structured, I did actually measure out the top this time. Screenshot these measurements!
- Paper up at 2 inches.
- You’re gonna need to cut four of these out for the top.
- Cutting It Out: Now that you have your pattern (or your mental image), cut out all the pieces. You’ll need four triangle pieces total – two for each side of the top.
- Sewing the Triangles: Now, sew the triangles around the border, but leave the top part open! I’m using a straight stitch here. Start, then reverse a bit to secure. Stretch the fabric slightly as you sew around the whole thing to give it a nice, clean edge. When you get to the end, lift that pressure foot, rotate the triangle, and leave the top open! Clip off any extra fabric.
- Turning It Right Side Out: Grab your loop turner (told ya it’s important!). Carefully push it through the opening and turn the triangle right side out. Believe it or not, it fits through a pretty small hole. How cool is that?
- String Time (Again!): Fold those string strips in half and sew them along the open edge, stretching as you go. Again, a straight stitch is your friend. When you get to the end, flip them right side out with your loop turner.
- Attaching the Strings: Attach the strings to the top corners of the triangle tops. Make sure the seam is facing up! Overlap the string and the peak of the triangle, and sew them together securely. Snip off any extra fabric.
- The Canal: For the string that goes around the waist, just sew another long strip of fabric using a straight stitch, stretching it out as you sew. Backstitch at the end for extra security. To measure how big the canal is, just line the thread up with the other side of the presser foot.
- String It Up: Rip the thread in between the seams to make a little hole. That’s how we’re gonna pull our string through.
- Finishing Touches: Tie a little knot at each end of the string to prevent fraying. I like to add a knot to the top strings too, just for a little extra flair.
And there you have it! Your very own, handmade, totally unique bikini top for just $10!
From Bikini Top to Beach Goddess: Beyond the Basics
Now that you’ve conquered the bikini top, the possibilities are endless! Here are a few ideas to keep those creative juices flowing:
- Mix and Match Fabrics: Don’t be afraid to experiment with different colors and patterns. A little bit of animal print never hurt nobody!
- Add Embellishments: Beads, sequins, fringe… the sky’s the limit!
- Make a Matching Bottom: Use the same fabric and create a full bikini set. You’ll be the envy of everyone on the beach!
Wanna Skirt Too?
We have enough fabric to make a skirt! Let me know if you want a tutorial for that.
So ditch the overpriced nonsense and get sewing! You might just surprise yourself with what you can create. And who knows, maybe you’ll even start your own bikini-making empire! In the meantime, check out some other DIY fashion hacks over at What Will Wear. Now go forth and create!
You can’t afford to not learn how to sew.Carl, show them what they’re charging for this.$80. I’m gonna show you how to do it with $10.Starting with the strings,fold your fabric in half and cut all the way to the end.It’s about two fingers wide.The one that attaches to the top of the triangleis gonna be shorter.I usually freestyle my triangle tops,but I used my hand as a guide.Fold it in half to make sure it’s symmetrical,like the bottom to be curved up a little bit.It fits better.I did measure out this top,so here are the measurements.Screenshot it.Paper up at 2 inches.You’re gonna need to cut four of these out for the top.Here’s everything cut out.The first thing we’re gonna sewis the triangles around the border,but we are not gonna sew the top part.I’m using a straight stitch,and I started out.I am gonna reverse itas I’m doing the border.I am gonna stretch it out the entire way.When you get to the end,lift the pressure foot up and rotate the triangle,leaving the top open.Cut off any extra fabric.Take your loop Turnerand flip the top right side out.Believe it or not,it fits through a pretty small hole.Here’s how that looks.Right side out.To make the strings,fold them in half and stretch it as you sew.It with a straight stitchclose to the border.Flip it right side out with your loop Turner.Attach this to the topwith the seam facing up.Attach it to the peak of the triangle top.And river, cut off any extra fabric.Make the canalthat we draw.The string that goes around the waist.Just a straight stitch,and you stretch that out as you sew it,reversing at the endto measure how big the canal is.Just line the thread upwith the other side of the presser foot.Rip the thread in between the seamsto make a little hole.That’s how we’re gonna pull our string through.To finish the end of the string,just tie a little knot.I like to add a knot to the top as well.Our top is done.This is our ten dollar bikini.And we have enough fabric to make a skirt.So let me know if you want a tutorial.video
Official Satisfy Off Road Spirit Of The Wild Shirts
Official Rancid Let The Dominoes Fall Shirts
Official Poorly Drawn Ghost Shirts
Official One Of My Weyes Blood Shirts