
Blog
Confidently You: A Guide to Sewing Your Own Supportive Bra Cups
Jun
Hey friend,
Have you ever felt like your clothes just weren’t quite *you*? Like something was missing in how they fit and made you feel? I totally get it. I’ve been there, staring into my closet, feeling frustrated that nothing seemed to capture my personal style or provide the support I needed.
Sometimes, the answer lies in the details, and that’s why I’m excited to share a little secret weapon with you: crafting your own bra cups! Forget the discomfort and limitations of store-bought options – this is about creating a custom fit that celebrates *your* unique shape and empowers you to feel incredible in everything you wear. It can be used for cosplay costumes, everyday garments or for adding structure to strapless dresses. I remember searching all over town for the perfect shape wear for a wedding once. I wasted so much time and money on products that were just ok. This can help avoid those same issues.
**Primary Keyword: Bra Cups**
**Secondary Keywords:**
- Sewing
- DIY Fashion
- Custom Fit
Why DIY Bra Cups?
Let’s be real, finding the *perfect* bra, or a garment that supports you without a bra, feels like searching for a mythical creature. Ready-to-wear clothes are made for a particular standard body type. Sewing your own bra cups opens a world of possibilities:
- **Unleash Your Creativity:** It is very rewarding and exciting to make something yourself. It’s your chance to truly get creative and design something that represents you. Check out some amazing designs here: https://whatwillwear.com/design-style/
- **Unbeatable Comfort:** No more pinching, digging, or gaping! You control the fit, the materials, and the level of support. Imagine the freedom of a bra cup that truly *understands* your body.
- **Eco-Friendly and Sustainable:** Reduce waste by repurposing fabric scraps and choosing sustainable materials. Fashion can be something we care deeply about! Check out what’s happening here: https://whatwillwear.com/political-social/
- **Budget-Friendly:** Save money by making your own instead of constantly buying ill-fitting store-bought options. Think of all the things you could do with the savings!
- **Full Coverage and Decency:** For those who desire more coverage, these bra cups will help to create a decent corset or dress by fully covering the upper part of the breast.
Your Step-by-Step Guide to Sewing Bra Cups
Okay, let’s dive in! Based on my own experience and some amazing tips I’ve picked up, here’s how you can create your own supportive bra cups:
1. **Gather Your Supplies:**
- Your chosen pattern.
- Bra foam (or a sturdy, supportive fabric).
- Boning (optional, but recommended for extra support). You can typically find boning at your local fabric store or online for around $5-$10, depending on the length and material.
- Sewing machine, thread, scissors, pins, and a fabric marker.
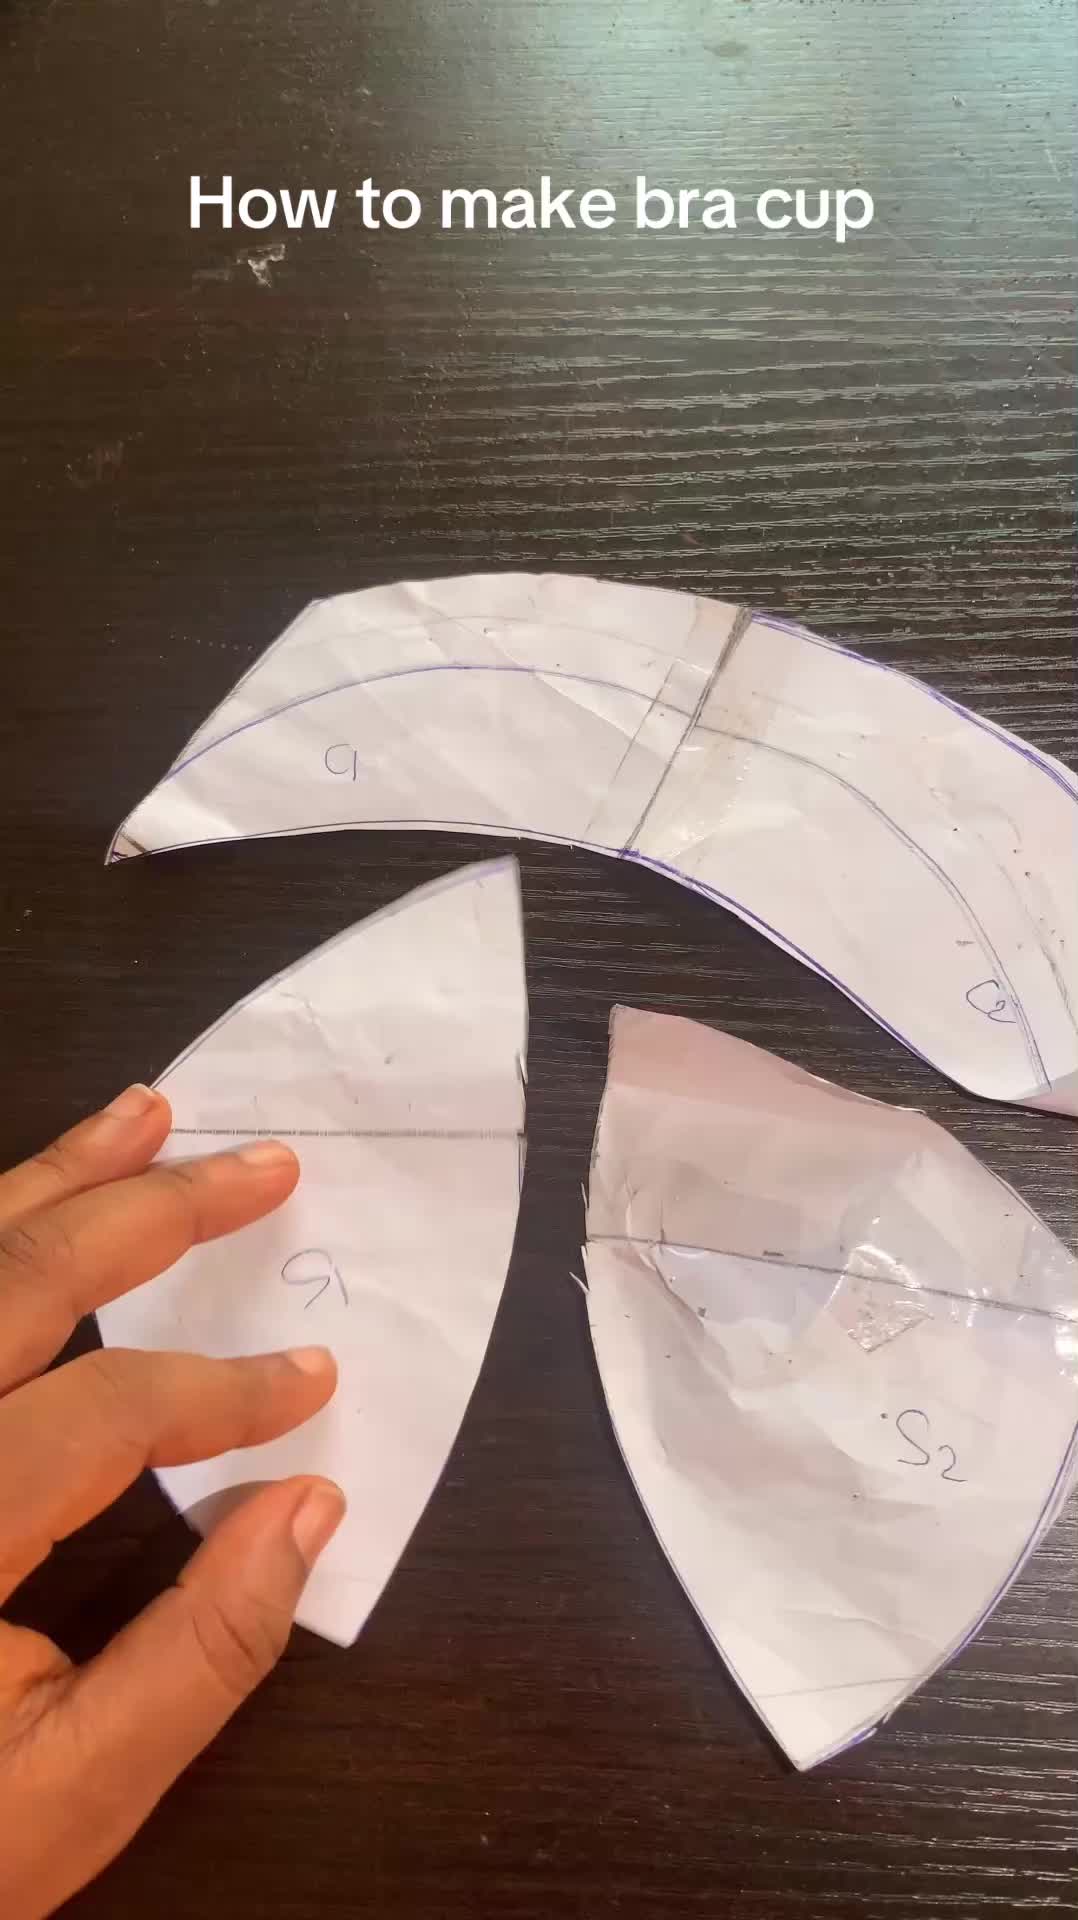
2. **Cut Out Your Pattern:**
- Carefully cut out your pattern pieces from the bra foam. Remember, accuracy is key here!
- **Seam Allowance:** Add a small seam allowance (about 1/4 inch) if you’re not using a zigzag machine. This will give you some wiggle room when sewing.
3. **Sew the Lower Parts Together:**
- Sew the lower parts of the bra cup together.
- **Top Stitching:** This is crucial! Top stitch along the seam to flatten it and prevent bulkiness.
4. **Attach the Upper Parts:**
- Pin and sew the upper parts of the bra cup to the lower section.
- Again, don’t forget to top stitch!
5. **Add Boning (Optional):**
- This step is a game-changer for support and structure.
- Attach boning along the seams between the upper and lower parts of the cup, as well as the main lines.
- The boning provides stability, ensuring the bra cup keeps its shape, even after washing.
- **Choose the Right Materials:** Experiment with different types of bra foam to find the one that provides the perfect balance of support and comfort for *you*. I personally love using a denser foam for extra lift.
- **Pattern Adjustments:** Don’t be afraid to tweak the pattern to better suit your body. This is all about creating a custom fit!
- **Practice Makes Perfect:** Your first attempt might not be flawless, and that’s okay! Embrace the learning process and celebrate your progress.
- **Top Stitching is Your Friend:** Seriously, it makes a world of difference in creating a clean, professional finish.
Tips and Tricks for Success
Beyond Bra Cups: Expressing Yourself Through Fashion
Creating your own bra cups is just one way to take control of your style and feel confident in your clothes. Once you master this skill, you can use it to:
- Add structure and support to strapless dresses or tops.
- Create custom-fit corsets and lingerie.
- Enhance cosplay costumes with perfectly shaped bra cups.
Fashion should be fun and expressive! Don’t be afraid to experiment with different styles and find what makes you feel amazing. I am so thankful I found my personal style and the courage to show it off! Check out https://whatwillwear.com/nostalgia-retro/ for some style inspiration!
Conclusion: Embrace Your Unique Beauty
Sewing your own bra cups is more than just a DIY project; it’s an act of self-love. It’s about taking the time to understand your body, celebrate your unique shape, and create something that truly empowers you. So, grab your supplies, unleash your creativity, and get ready to feel confident and supported in everything you wear.
You got this, friend! And remember, I’m here to cheer you on every step of the way.
How to make bra cup how to make bra cups using our patternand what we will need here is your patternthen you need a boning and you also need a bra foam so cut out ourthe shape of our pattern on the bra foamso after cutting it out I added 00.25 for my allowance because I’m not using a zigzag machineso I needed the allowanceso went to the machine to sew the lower parts togetherfirst you have to sew it together and while you sewplease remember to stop stitch so that it will be flatit will give you that flat lookit won’t be bulky therethen we’ll bring in the upper parts also and fix it togetherso when you also fix remember to top stitchdon’t forget to top stitch and went ahead to go and add our boningwe added our boning at every part of itwe added boning at the line between thethe top part and also that the main lineso we added boning to the both sideand the Bonny was just to make it stand stronggive it like a very strong structureso that when you even wash the dressit doesn’t fall off at any point in timeso I hope this helps you and why I love thisthis method of making this back upbecause most times it’s for people that are very bossymaybe when you Are at homeyou want to make a corset and you don’tyou don’t you can’t go to the market or you can’tyou don’t have access to Black Ops at that point in timeand secondly covers the upper part of your breast where we likeit’s actually make you have like a very decent corset.So thanks for watching and if you enjoy this video say thank you too.Bye.video
World Cup Usa 94 Soccer Logo Shirts
When She Suckin On Youre Nuts And You A Gangster Shirts
When She Suckin On Youre Nuts And You A Gangster Meme Shirts
Vince Lombardi Green Bay Packers Faith Family Football Shirts